Dash of Inspiration: Image Quality – Resolution
A Dash of Inspiration, A Cup of Creativity by Doreen
Image Quality: Resolution

Let’s keep this series going by moving through the IMAGE QUALITY grouping of the Submission Guidelines, and next up is:
IMAGE QUALITY: Resolution
The Submission Guidelines state this:
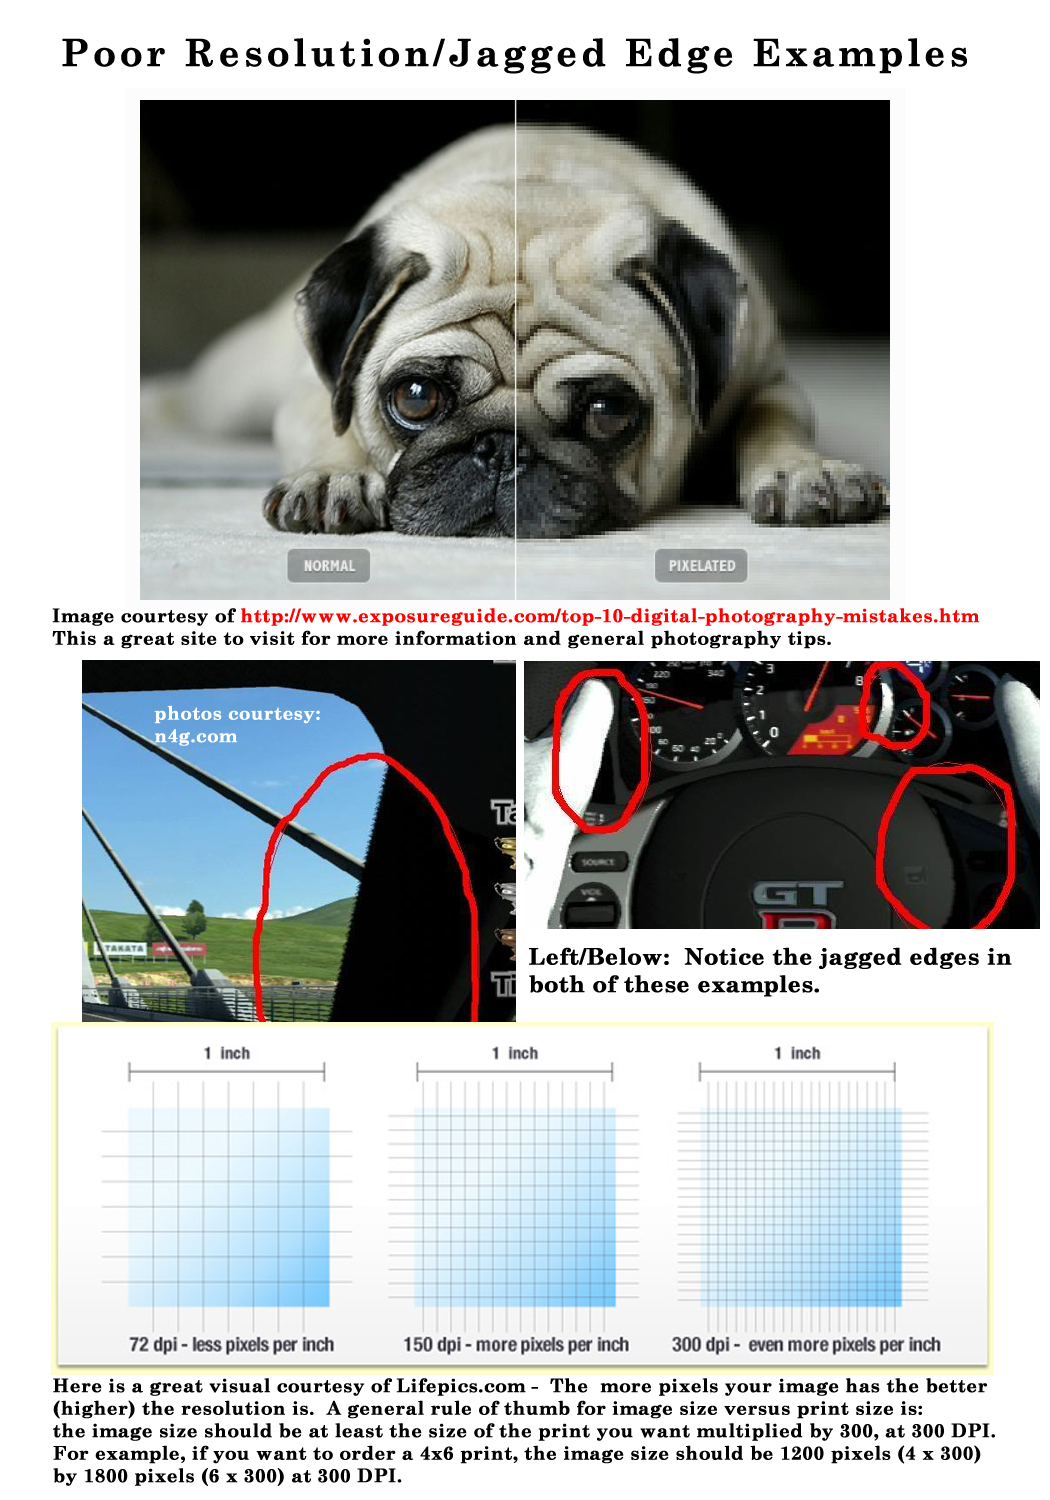
The term resolution can be defined as both the number of pixels per inch in a digitized photograph or piece of art determining width and height. When the resolution is too low, in the case of GCU less than 300 ppi (pixels per inch), it results in both a loss of sharpness and the image gets a “pixelated” look . . . you see the small squares that make the image, or lastly; straight lines show a “staircase” effect so at full-size you see jagged edges. None of these effects will be accepted.
Signs of Resolution Issues: Resolution issues can show up as a ‘blocky’ effect or as digital gurus call it; pixelated – in other words, you can see the pixel squares making up the image. Jagged edges, which often look like a series of stair steps, are another sign of possible resolution issues and often show up when you have ‘up-sized’ an image beyond it’s original dimensions, in other words increased the size of an image beyond that which is was original captured. This applies to digital capture, scanning artwork and/or creating in a digital environment. Jagged edges (also referred to as Jaggies / Aliasing) can also occur with excessive sharpening in digital processing.
Understanding Resolution: I could not have explained better than this quote from Lifepics.com :
“A general rule of thumb for image size versus print size is: the image size should be at least the size of the print you want multiplied by 300, at 300 DPI. For example, if you want to order a 4×6 print, the image size should be 1200 pixels (4 x 300) by 1800 pixels (6 x 300) at 300 DPI. If the image size was half of that (600 by 900), then the 4×6 print would likely come out distorted or pixelated if you were to order a print.“
A common mistake often made is to re-size an image’s dimensions, while keeping the resolution the same. For example you have a clip art piece that is 2×3-inches @ 300 dpi/ppi and you want to use it on your 5×7 greeting card, so you re-size the clip art to 4×6-inches at 300 dpi/ppi … you have now caused pixelization and/or jagged edges. The same would go for taking a 5×7-inch image @ 72 dpi/ppi and changing the 72 to 300 dpi. You CAN NOT ‘enlarge’ an image without causing resolution issues.
Tips:
- Always set your digital camera to capture in the highest resolution available.
- If you are scanning artwork, please refer to the section on Tips for Scanning at the Right Resolution
- Every time you save a file as a JPEG, you compress the image and lose a little quality. And each time you open and close a JPEG (even if you perform no editing on it), you still lose quality. If you plan to make a lot of changes to an image, it’s best to save it initially in an uncompressed format, such as PSD, PNG or TIFF.
- Images can be sized down, but should NEVER be increased in size!
- If your photos have jagged edges straight out of the camera, you should probably turn automatic in-camera sharpening off.
- Remember when dealing with digital photography that it renders in square pixels. Any diagonal line, especially those of high contrast, will render as a series of squares that touch at the corner. If you are not careful with your processing techniques and/or work in a compressed file format, you may cause these diagonal squares to become jagged.
For learning more about image file types, this is a good read.
Next week we’ll continue through the Submission Guidelines: Image Quality section and discuss Excessive Effects. Till next week, I hope I’ve inspired you to go look through your store and see if you can weed out any images that the reviewers will find during their weeding which might have unacceptable resolution issues.
For great resources & tips visit the SalonOfArt


Doreen, so I just had a ton of older cards Now declined! So, some of them I really really like but since gcu says they’re no longer good enough, how can I make them acceptable?
I just had a ton of cards declined and pulled as well. They are original artwork, I am a professional children’s book illustrator and have all been scanned at 300 dpi, 5 X 7 inches, and was approved as “best ” quality. It makes no sense to me and for the .19 we get for cards now, I think the whole thing is rather a waste of time.
Wendy, as to “best” designation, you’re talking about the indicator under the thumbnail card images when you upload, right? That’s not an indicator of quality. It just means the file you uploaded is the right size.
For the declines, that is part of a clean-up effort GCU began in January 2012. I can only quote what Admin usually has to say:
“Your cards have been returned as part of the ongoing evaluation of onsite cards. Please see the related link below:
http://www.greetingcarduniverse.com/forum/yabb2/YaBB.pl?num=1421879451/0#0
GCU officially established Submission Guidelines and put them into practice in January of 2012. Notifications and reminders have been posted several times on the forum since it’s inception regarding this and we have been encouraging artists to go through their stores and make improvements as needed.
Many older cards are being declined or returned for edits in this effort.
Reviewers do not have access to sales data so if you feel a strong selling card has been declined please send the card review team an email with the PIDs of the cards in question and we will forward it for consideration. We can share that reinstatement of a declined card is assessed using the following criteria for strong sales = recency, frequency and relevancy.”
Since Admin doesn’t necessarily see comments on older posts here, you may want to take it up on the GCU Forum.
Corrie