Dash of Inspiration: Budget Photo Editing Tools
A Dash of Inspiration, A Cup of Creativity by Doreen
Budget Photo Editing Tools

Not every photographer, especially those new to the field, can afford the ‘pro-version’ tools for post-processing their photos. I’ve not personally tried these more affordable options, but I thought it might be helpful to some if I did the research for you and offered the list so you may check them out for yourselves.
Before I share this information, please keep the following tips in mind:
- If the software will not allow you to save your modifications in an uncompressed format (PNG, TIFF, etc.), then you should abort testing and move on.
- Most of the ‘shareware’ editing software does not have the level of detail in the development (layering, etc.), therefore always leave your original photograph UNTOUCHED and safely stored away. Instead use an uncompressed ‘copy’ of the photo when you edit in these programs. NEVER work in jpg – this format should only be your saved choice when your editing is complete and you are creating the file to upload.
- Remember one of the features you pay for in tools such as; my list at the bottom, is that you work in a non-destructive environment. These less developed software options are often a very destructive environment, meaning they actually change the pixels making up your image and those changes can not be reversed – thus the reason to never work with your original file.
- Software only helps if you LEARN what to see in your photos which need improvement; tonal values, color casts, distractions, etc. – AND, software will not correct poor composition, perspective, lack of clarity, etc.
Photo Editors on a Budget Under $100 dollars – visit the links to read the full review for each.
- Corel PaintShop Pro X6 – http://photo-editing-software-review.toptenreviews.com/paint-shop-pro-review.html
- Adobe Photoshop Elements 12 – http://photo-editing-software-review.toptenreviews.com/photoshop-elements-review.html
- Serif PhotoPlus X6 – http://photo-editing-software-review.toptenreviews.com/photoplus-review.html
- Xara Photo & Graphic Designer 9 – http://photo-editing-software-review.toptenreviews.com/xara-xtreme-review.html
- Corel PhotoImpact X3 – http://photo-editing-software-review.toptenreviews.com/photoimpact-review.html
- ACDSee Photo Editor 6 – http://photo-editing-software-review.toptenreviews.com/acdsee-photo-editor-review.html
- Cyberlink PhotoDirector Ultra 5 – http://photo-editing-software-review.toptenreviews.com/cyberlink-photodirector-ultra-review.html
- PhotoStudio 6 – http://photo-editing-software-review.toptenreviews.com/photostudio-review.html
- Photolightning 5.51 – http://photo-editing-software-review.toptenreviews.com/photolightning-review.html
- Photo Impression 6.5 Gold – http://photo-editing-software-review.toptenreviews.com/photoimpression-review.html
- Pixelmator 2.2 ‘Blueberry’ – http://www.pixelmator.com/
- Ashampoo Photo Optimizer – http://download.cnet.com/Ashampoo-Photo-Optimizer/3000-12511_4-10657920.html?tag=mncol;5
FREE Photo Editors
- GIMP 2.8 – http://www.gimpshop.com/full_version/free_photo_edit_program/?gclid=CLmP5vj45b8CFYhcMgodcSAAqw – GIMP Tutorials: http://www.gimp.org/tutorials/
- net – http://www.getpaint.net/
- Pixlr Editor – http://pixlr.com/ – http://pixlr.com/editor/
- PicMonkey – http://www.picmonkey.com/editor?gclid=CNaPlcj45b8CFfA-MgodFQQAJA
- PhoXo – http://www.phoxo.com/en/
- Photo Pos Pro – http://www.photopos.com/
- PhotoScape – http://photoscape.org/ps/main/index.php
- Picasa – http://picasa.google.com/
- LazPaint – http://graphicssoft.about.com/od/freesoftware/fr/lazpaint.htm
- Fotoflexer – http://www.pcmag.com/article2/0,2817,2370495,00.asp
- Picnik – http://www.pcmag.com/article2/0,2817,2370485,00.asp
- Zoner Photo Studio – http://download.cnet.com/Zoner-Photo-Studio/3000-2192_4-75186165.html
- FileStream Image Broadway – http://download.cnet.com/FileStream-Image-Broadway/3000-2192_4-10283777.html?tag=mncol;1
- Free Image Editor – http://download.cnet.com/Free-Image-Editor/3000-2192_4-10623587.html?tag=mncol;8
Remember, I can not recommend any of the above tools, with the exception of Photoshop Elements and GIMP, as I have not used any of the others. The tools I use and recommend are:
- Camera Raw or Lightroom http://blogs.adobe.com/photoshopdotcom/2013/06/lightroom-5-now-available.html
- Photoshop CS-5
- Nik Software (full suite) – http://www.google.com/nikcollection/
- Topaz Labs (full suite) – http://www.topazlabs.com/
- Perfect Photo Suite from OnOne – http://www.ononesoftware.com/products/suite8/
So until next week … Learn … Create … Inspire!

Share this:

Design Spotlight: CR Design

Our Design Spotlight falls today on new GCU artist Chintami Ricci of CR Design and some very fabulous florals!
_________________________

Hello all! My name is Chintami Ricci, I am a graphic, conceptual designer, artist and illustrator from Indonesia. I have 4 years of experience in graphic industries. Having worked for in-house design and agency, I’m flexible for ranging experiences from print-packaging design, illustration to 3D product and booth design. I love everything related to art and design, thus I always learn and learn to improve my skills. Making greeting cards is an activity that I do in spare time. Everyday, I work as a designer and face some clients. Here’s a link to my portfolio.
I newly joined GCU on 28 June 2014, so my greeting card designs are still not many, but I enjoy making greeting cards for people, especially when I can envision their happy expression when they buy my greeting cards. That gives me a lot of satisfaction.
I focus my card design on feminity and flowers, as I love to plant kinds of flowers at home in my spare time and take pictures of them. Sometimes I also paint them. Flowers are the universal symbols of beauty and happiness, often used as gifts, anniversaries, or sympathy.
Many people just see flowers as common things, but because I plant and take care of flowering plants every day, I understand the miracle of nature that grow things from a spot into something beautiful. I am from Asia so when I plant European flowers, I can’t start with the plant cuttings so I always plant from seeds. Growing a flower from a really tiny seed (such as Petunia), and see its growth until blooming is truly a hard work, can take months even years until we have a beautiful flower in our garden. And sometimes the growth is disturbed by rains, insects, and rodents. So for me that’s the meaning of a beautiful flower. It has surpassed a lot of processes and survived until it blooms.
Plants can adapt to its environment when they are planted from seed. So when I plant peony seeds and they managed to grow in my garden, it means they now can adapt to tropical climate. That’s the strength and spirit of flowers.
We have an example a few days ago, about a strong boy who has to face cancer in his life, Danny Nickerson. I sent a flower birthday card from one of my cards in GCU to him, hoping that he will smile, be strong and spirited like flowers when seeing my card and design J. I’m also so touched that so many people sent to him, lots of cards from GCU. It means the cards have made us all happy, either when sending or receiving them, and how precious that happy moment is although it’s only for a while.
I also like exploring through the website forums, and learning a lot from some experienced fellows who have been successful in selling cards here. My dream in the future : if later I already have a lot of cards in my store, I’d like to take a photo of my cards (as many cards as possible) displayed on the front, and me on the background. A real card store owner feeling! 😀
I wish all of you best of luck in selling cards in GCU, never give up, and always radiate positivity to your buyers and yourselves. Cheers!
Share this:

Critique Clinic – July 25-27, 2014

How does it work? For three days a week (Friday-Sunday midnight), I will open the clinic to any artist who wants an honest peer review and critique of a card which gets plenty of clicks but no sales, so something’s probably not quite right, or you’ve got a new design you want to test drive, or you’re unsure about the marketability of a card. Or perhaps you’re a newbie who isn’t sure if a card is up to a marketable standard. Anyone is welcome to participate. In fact, I encourage everyone to at least look at the cards in question and read the critique comments – you may learn something. The purpose of the clinic is to help artists improve the commercial appeal and marketability of their cards.
THE RULES
- ONE card per artist only.
- Card must be intended for sale at Greeting Card Universe.
- To submit a card for critique, post a link to the card at GCU in the comments section of this clinic post. Allowances will be made if you’ve had a card declined, or made a new design you’d like advice on before submission. Give us the link where we can see the card, such as your private gallery, Flickr, Tinypic, etc. If you do give a private gallery link, be sure your private module gallery is ON. Please do not post links to your Manage Cards section – do you really want strangers tinkering with your cards? And please don’t ask us to critique a card that’s pending review – we can’t see it until it’s approved.
- Any artist is free to comment and/or give a critique of a submitted card. HOWEVER, post-and-run comments like “great card” or “you suck” will not be tolerated, nor will abuse. Criticism should be constructive, not destructive. Play nice or you will be banned.
- I also won’t tolerate temper tantrums if you decide your “artistic integrity” is being stepped on because you asked for a critique, and someone told you the photo you’re using isn’t in focus. If you can’t take honest criticism, don’t submit. Once gets you a warning; twice and you’re banned from submitting in the future.
- Artists who critique may do so by giving their opinion, posting an example of another card, or pointing the submitter to a video, on-line article, or other helpful suggestion.
- Don’t forget that artists who are giving you tips and helpful advice are volunteering their time and trouble. Be nice. A link back to their store on your website or blog is appreciated (but not mandatory).
- You are free not to take any advice offered. There’s no guarantee any card will be a bestseller, so don’t come into the clinic with unrealistic expectations.
- Rules may change as we go along and we see how things turn out, okay?
So without any further ado, I declare this week’s Critique Clinic open!
Share this:

Tips and Tricks: Star Submitter

(Note: Since the question has come up on the Forum recently, here’s the low-down on becoming a Star Submitter)
You Can Be a Star … Submitter!
Every card submitted at Greeting Card Universe goes through a review process to ensure the design meets GCU’s submission and marketability standards. Of course, this takes time. It’s hard waiting to learn the fate of new designs. Will the be Accepted? Declined? Returned for Edits? Or will the remain Pending a while?
Is there a way to speed up the waiting time? Yes. If you want your cards approved quickly, you should work toward achieving Star Submitter status.
What’s a Star Submitter? An artist who achieves this status may Fast Track all cards, gaining expedited reviews.
Who Chooses Star Submitters? The Review Team nominates artists whom they believe fit the criteria below.
How Do I Become a Star Submitter? An artist must show – consistently – that their card designs meet marketability standards and conform to GCU’s submission guidelines, contain no spelling or grammatical errors and avoid mistakes such as design elements over the margin and trim lines, use correct and relevant keywords and categories, create good titles, and basically do everything right from the get-go. To become a Star Submitter, learn the rules. Study the GCU Wiki. Understand the guidelines and standards. Make certain your images and verse fit the occasion.
What Do I Get As a Star Submitter? Expedited reviews. All cards are Fast Tracked, so you don’t have to wait weeks for your new cards to be approved.
Who Can Become a Star Submitter? Anyone! If you apply yourself – that’s the key. Star Submitter status is a reward for artists who have invested their time into mastering the “art” of GCU.
How Do I know When I’ve Become a Star Submitter? When you’re in the process of uploading your card, you’ll see text already in the Note to Reviewer field that says: “I am a Star Submitter so please expedite the review of this card.” Don’t delete the note! You will also find the Fast Track option has been checked. Don’t change it! As a Star Submitter, your submissions receive expedited reviews via Fast Track.
Star Submitters must still follow all Submission Guidelines. They must also continue to include links to website/TOU of any 3rd party elements in their designs.
So if you want faster review times, reduce the errors in your card designs, don’t make silly spelling mistakes, stay in the margins, and learn (and apply) the Submission Guidelines. And perhaps one day, you can be a Star Submitter too!
Share this:

Font Frenzy: 40 Vintage/Retro Fonts

Here’s a list by our friends at Noupe of 40 Free Retro Fonts Not Only for Hipsters. Some are okay for commercial use, some are personal only. Check the TOU of each font before you download. There are a couple of examples below. Have fun!


Share this:

Nuts and Bolts: Earnings FAQ

There seems to always be some confusion over when GCU pays artists their earnings, so in this article, we’ll give you the facts you need to know and hopefully answer some of your questions.
When Does GCU Issue Payment to Artists?
GCU calculates artist’s earnings on a quarterly basis. You will be paid at the end of the month following the Quarter.
1st Quarter: January—March – Paid April 30
2nd Quarter: April—June – Paid July 31
3rd Quarter: July—September – Paid October 31
4th Quarter: October—December – Paid January 31
I Haven’t Received Payment – What Should I Do?
Check to be sure of the following:
- You have reached your minimum payment setting (go to Manage Store and look at your Account Settings)
- Your contact information/address is correct (if you have requested payment by check)
- Your PayPal information is correct (if you have requested payment by PayPal)
Contact shaun (at) bigdates.com or kc@bigdates.com
Where Can I Find Out How Much Earnings I Will Be Paid?
When you are logged in to GCU, go to Manage Store > Reports & Analysis > Earnings & Payments.
At the top of the page, you will see an amount “Pending.” That amount is what you have earned to date since the end of the last quarter — your standard earnings (to receive premium earnings, you must meet the earnings threshold for each quarter). See Mindy’s Forum Post if you don’t understand these terms.
For a break-down of cards sold/earnings made, go to Reports & Analysis > Store Report. Don’t forget to input the correct dates for the information you want.
You will also see a list of your Payments History. At the end of this list, you’ll see another “Pending” amount with a date. This is your earnings from the last quarter. See “When Does GCU Issue Payment to Artists” to find out when you will be paid this amount, provided it meets your minimum payment setting.
How Does GCU Calculate Artist’s Earnings Based on the Earnings Thresholds?
As of July 2014, see Mindy’s Forum Post for all the information.
To see how you’re doing toward meeting the earnings thresholds, go to Manage Store. On the right side of the page, you’ll see “Your Earnings” which will give you the amounts of the current Quarter and the previous Quarter.
That’s the basics and I hope we’ve answered the most common questions. Happy selling!
Share this:

Dash of Inspiration: Retro Resources
A Dash of Inspiration, A Cup of Creativity by Doreen
Retro Resources
Time for another round of goodies! Hopefully, these vintage and retro resources will spark a fire in your imagination!
PencilMate – Instant Pencil Effects in Photoshop by Rafi
Create realistic pencil effects for your typography and illustrations. Not free ($12.00) – Look what’s included in the download:
- PSD file in Landscape mode (3000 x 2000 pixels)
- PSD file in Portrait mode (2000 x 3000 pixels)
- 7 Pencil Stroke PS brushes (.ABR file)
- 3 Stroke and 1 Paper PS Patterns (.PAT file)
- 2 Textures (within the PSD files)
- 20+ Decorative Vector Swirls (within the PSD files)
- Pencil, flake & pencil pieces images (within the PSD files)
Vintage Badge Templates – Brushes, Vectors and Textures by Nathan Brown
Included are 12 brushes and 12 vector badges. The badges are blank allowing you to layout your own text and embellishments. The download also includes 8 vintage paper textures for use with the badges.
Grunge Stamp Borders Multi-Pack by Nathan Brown
This resource features 12 grunge stamped style vector borders. The download includes AI and EPS vector files, as well as, PS brushes and vector shapes. A bonus 8 worn paper textures are included for use with the stamp shapes.
Mervale Script font – by Astigmatic One Eye Typographic Institute
Redressed font – by Astigmatic One Eye Typographic Institute
So until next week … Learn … Create … Inspire!

Share this:

Critique Clinic – July 18-20, 2014
How does it work? For three days a week (Friday-Sunday midnight), I will open the clinic to any artist who wants an honest peer review and critique of a card which gets plenty of clicks but no sales, so something’s probably not quite right, or you’ve got a new design you want to test drive, or you’re unsure about the marketability of a card. Or perhaps you’re a newbie who isn’t sure if a card is up to a marketable standard. Anyone is welcome to participate. In fact, I encourage everyone to at least look at the cards in question and read the critique comments – you may learn something. The purpose of the clinic is to help artists improve the commercial appeal and marketability of their cards.
THE RULES
- ONE card per artist only.
- Card must be intended for sale at Greeting Card Universe.
- To submit a card for critique, post a link to the card at GCU in the comments section of this clinic post. Allowances will be made if you’ve had a card declined, or made a new design you’d like advice on before submission. Give us the link where we can see the card, such as your private gallery, Flickr, Tinypic, etc. If you do give a private gallery link, be sure your private module gallery is ON. Please do not post links to your Manage Cards section – do you really want strangers tinkering with your cards? And please don’t ask us to critique a card that’s pending review – we can’t see it until it’s approved.
- Any artist is free to comment and/or give a critique of a submitted card. HOWEVER, post-and-run comments like “great card” or “you suck” will not be tolerated, nor will abuse. Criticism should be constructive, not destructive. Play nice or you will be banned.
- I also won’t tolerate temper tantrums if you decide your “artistic integrity” is being stepped on because you asked for a critique, and someone told you the photo you’re using isn’t in focus. If you can’t take honest criticism, don’t submit. Once gets you a warning; twice and you’re banned from submitting in the future.
- Artists who critique may do so by giving their opinion, posting an example of another card, or pointing the submitter to a video, on-line article, or other helpful suggestion.
- Don’t forget that artists who are giving you tips and helpful advice are volunteering their time and trouble. Be nice. A link back to their store on your website or blog is appreciated (but not mandatory).
- You are free not to take any advice offered. There’s no guarantee any card will be a bestseller, so don’t come into the clinic with unrealistic expectations.
- Rules may change as we go along and we see how things turn out, okay?
So without any further ado, I declare this week’s Critique Clinic open!
Share this:

Design Challenge for July


We’ve had a lot of customer requests and added categories this month already, so let’s have a Design Challenge.
Go to the Wanted: New Cards section of the Forum.
Choose a request made in July. (The challenge applies only to new requests made in July 2014).
Create a card design & upload/submit your new card to GCU.
Once the card is approved−remember, you’re allowed to Fast Track these requests−post the PID# here in the comments section of this post.
I will post all entries in the Design Challenge here on the Community blog. If you want extra exposure (good for your marketing), include a little something in your comment post about the card and/or yourself to get an individual feature. In other words, toot your own horn & you can have the blog post all to yourself.
Designers of the best marketable designs will receive an invitation to pin their card on a special Pinterest board.
The challenge will continue until July 31. On August 1, I’ll begin announcing.
Have fun, y’all!
Share this:

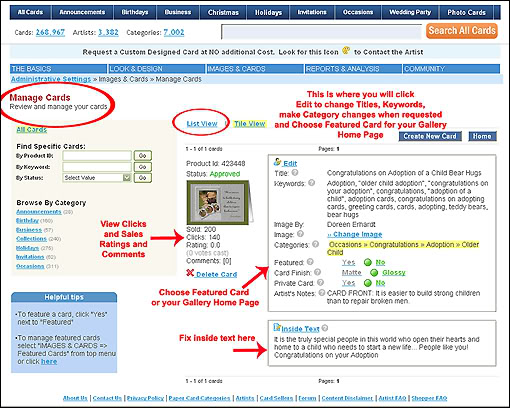
Nuts and Bolts: Changing Front of Card Image
Sometimes an artist wants to refresh and update an older card’s design, address previous flaws, or wishes to change the image on the front of a previously approved card. The Review Team periodically goes through artist’s stores and will delete older cards that no longer fit the Submission Guidelines, so doing some cleaning and revising yourself is always a good idea.
Revising older designs not only breathes new life into your card collection, it can also result in increased sales. By changing the front of card image (as opposed to deleting the card in favor of a new design) you can keep the card’s stats intact.
Here’s a basic primer on how to do it and some rules to follow.
The Rules
You may change a card’s image to:
- Correct spelling/grammar errors
- Improve/clean up a so-so photograph
- Update an older design provided the occasion and/or relationship/occupation/etc. specific purpose of the card remains the same. Artists are unable to alter categories after a card has been submitted, so you can’t change a Birthday card to a Mother’s Day card as that would require a change of category. In that case, create and upload a new card
- Make improvements to layout, color, font choice, etc
- Change the date (for date specific cards in New Year’s Eve or Graduation categories, for example)
How To Change the Front of Card Image
- Log in to GCU
- Upload the new card design you want to use
- Go to Manage Store
- Choose Images & Cards > Manage Cards
- Look on the left side of the page. You can search for the card by 1) PID#, 2) Keyword, 3) Status, 4) Card Front
- Once you have completed your search and have the result, click Edit
- Beneath the large image of the card, you’ll see Change Image
- Click the link to choose the updated image you uploaded earlier
- Don’t forget to Save Changes when you’re finished
The GCU Wiki: ” If you are doing this as part of an EDIT and RESUBMIT prior to a card being approved, you will have to find the updated card by doing a search in Manage Cards for EDIT and RESUBMIT cards (Note: Use the menu on the left to select a search by Status). When you do this a RESUBMIT button will accompany the card so that you can resubmit the card for final review.”